http://www.sweetoothdesign.com/#!home/c1hd9 http://www.sweetoothdesign.com/#!about/csnu http://www.sweetoothdesign.com/#!knowledge/c1se http://www.sweetoothdesign.com/#!design/cwvn http://static.wixstatic.com/media/aa9289_4abdbcefa3d5447faf8c905e338935e3.png_srz_p_117_117_75_22_0.50_1.20_0.00_png_srz http://static.wixstatic.com/media/aa9289_31ac184bf63c4d84a44351816c61471e.png_srz_p_117_117_75_22_0.50_1.20_0.00_png_srz http://static.wixstatic.com/media/aa9289_31ac184bf63c4d84a44351816c61471e.png_srz_p_117_117_75_22_0.50_1.20_0.00_png_srz http://static.wixstatic.com/media/aa9289_31ac184bf63c4d84a44351816c61471e.png_srz_p_117_117_75_22_0.50_1.20_0.00_png_srz
Showing posts with label fun. Show all posts

Friday, December 12, 2014

Layered Peppermint Fudge

http://www.aspicyperspective.com/layered-peppermint-fudge.html

Fudge is such a SWEET snack for the holiday, and this recipe, by A Spicy Perspective, will not disappoint your guest! Made with 3 layers of chocolate: milk chocolate fudge, peppermint flavored white chocolate, & almond bark on top, the colors of these layers are stunningly beautiful! Topped with crushed peppermint candies, this recipe looks playful & attractive.

Enjoy & Try out this recipe for the holiday season with your friends!

Original Recipe:
http://www.aspicyperspective.com/layered-peppermint-fudge.html

Tuesday, December 9, 2014

Snowy Chocolate Pinecones Recipe

http://www.handmadecharlotte.com/recipe-snowy-pinecone-snacks/

It is fascinating to see so many creative edible Christmas treat for this year! Just like a traditional gingerbread house, this recipe is fun to make with friends & kids. Introduced by Handmadecharlotte.com, this recipe is made by Choco­late cereal, pret­zel sticks, peanut butter, Nutella (choco­late hazel­nut spread), softed but­ter, and pow­dered sugar.

Original Recipe
http://www.handmadecharlotte.com/recipe-snowy-pinecone-snacks/

Saturday, November 29, 2014

Golden Santa Bread Recipe

http://www.tasteofhome.com/recipes/golden-santa-bread

Christmas is nearby! It is time to get inspired with lots of Christmas Santa recipe for the holiday! With your choice of bread dough, from homemade dough to frozen ready-to-use dough, follow these steps to make your own Santa Bread!

Original Recipe:
http://www.tasteofhome.com/recipes/golden-santa-bread

Wednesday, November 12, 2014

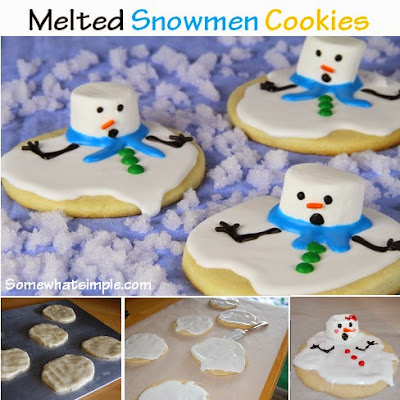
Melted Snowmen Cookies

http://www.somewhatsimple.com/melted-snowman-cookies/

These melted snowmen cookies had been very popular over baking blogs! They look very adorable and easy to make, which is quite nice for a Christmas Cookie Gift. Don't forget to check out the inventor of this recipe from The Decorated Cookie too!

Recipe:
http://www.somewhatsimple.com/melted-snowman-cookies/

Wednesday, October 29, 2014

Mummy Dogs

http://www.ourordinarylife.com/2013/10/hillshire-farm-ball-park-beef-mummy-dogs-recipe/

Another easy and fun recipe you can make with your friends for Halloween! Created by Ourordinarylife.com, this is a quick and simple DIY for your Halloween breakfast! Basically, you only need 2 ingredients: hot dog and crescent roll dough. First, split the hot dog into a human figures: with 2 legs, 2 arms. As shown, cut out small strips of crescent roll dough. Then, wrap it all around the hot dog figure. Bake the mummy dogs for 15 minutes in a pre-heated 350F degree oven. And HERE, serve it hot and enjoy!

Original Recipe:
http://www.ourordinarylife.com/2013/10/hillshire-farm-ball-park-beef-mummy-dogs-recipe/

Saturday, October 18, 2014

Halloween Chocolate Bowl

 
What makes a good Halloween candy bowl? Not only you can eat the candy inside the bowl, you can eat the bowl too! What you will need is a small balloon, melted chocolate, and orange food coloring. For specific direction, check out the tutorial by craftinterrupted.com now!

Original Recipe:
http://www.craftinterrupted.com/2012/10/halloween-chocolate-bowls.html

Wednesday, October 15, 2014

Trick-Or-Treat Cookies

This is going to be a very fun cookie project to make with kids for Halloween! Created by Blog Not Martha, this cookie recipe was inserted with either "trick" or "treat" candy inside. Either way, it will be a nice treat for everyone! Check out recipe below!

Original Recipe:
http://www.notmartha.org/archives/2012/10/18/trick-or-treat-cookies-for-halloween/

Thursday, October 2, 2014

The Great Pumpkin Cake Made by Fluted Cake Pan


It is October already! Since it is the Month of Halloween, we are exciting to share tons of cool Halloween recipes! Let's start with a pumpkin cake! Not only flavored with pumpkin spice, the cake literally will look like a pumpkin too! By using two fluted cake pans, make 2 cakes. After baked and cooled, put the two cakes together to form a pumpkin! Feel free to check out recipe from Amerrierworld.com!

Original Recipe:
 http://amerrierworld.com/2009/11/02/the-great-pumpkin-cake/ 

Saturday, August 23, 2014

Adorable Easter Egg Cupcake


We were supposed to wait until next Easter to post this recipe, but this is too adorable to not to share with everyone right now! What a fun project to work with kids and friends! Remember to decorate the cupcakes with chick faces in the end! Find directions at Cupcakeproject.com below.

Original Recipe:
http://www.cupcakeproject.com/2011/04/easter-cupcakes-baked-in-real-egg.html

Tuesday, August 12, 2014

Cupcake Decoration inside Liners

http://weheartit.com/entry/121620856/via/Kittylolo?page=2

This is an easy way to decoration your cupcakes, especially if you are planning to make them as a gift. When putting into a gift box, it is often messy and frosting usually melted by the time you hand the gift to your friend. This method of decorating cupcake pretty much avoid all those trouble because it is part of the cupcake.

First, you have to prepare all the tools and ingredients you need:
- piping bag or condiment bottle
- silicon liners (how to bake in silicon liners)
- cupcake batter in two or more colors
- oven

Direction:
1. clean, dry, and Spray/butter/oil liners (so that cupcakes can smoothly come out afterwards) 
2. Pipe out the patterns, shapes, decorations you like on the liner.
2. bake for 5-10 minutes or until decorated part of the cake is solidified.
3. Add the rest of the batter (another color) on top of that, and bake until it's ready! Read your cupcake mix's direction.
4. Remove silicon liners from cupcake, you should be able to see those patterns you make!
5. Wrap it up as a gift or enjoy this adorable cupcake right away!

Photo source:
http://weheartit.com/entry/121620856/via/Kittylolo?page=2

Friday, August 8, 2014

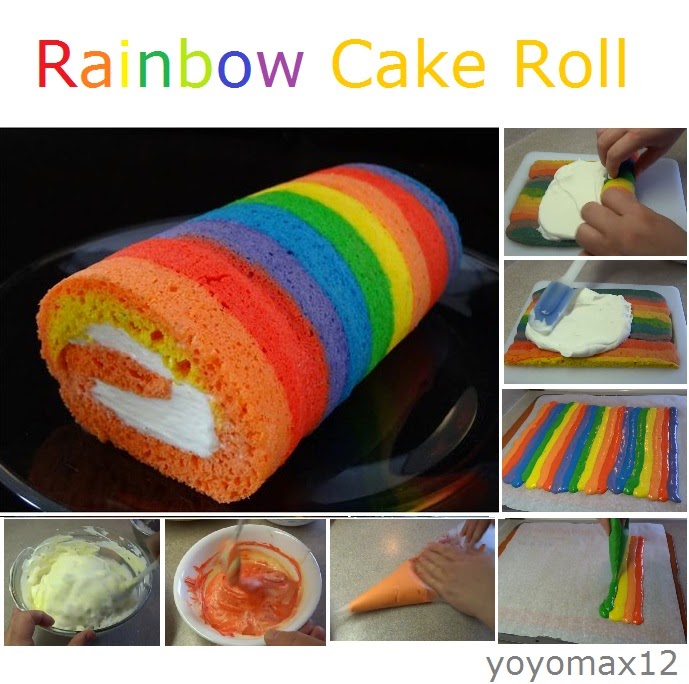
Rainbow Cake Roll


What a fun cake roll to make! Created by yoyomax12, this recipe is quite flexible to work with, especially its final look. Using the same rainbow batter, you can create different patterns. (Photo below) Be creative with your rainbow cake roll, and watch her video below for more details on how to make this yummy rainbow cake!
LOVE FOOD TODAY | Serve Your Own Creative Recipes of Foods and Drinks » RAINBOW ROLL CAKE


Original Recipe:
https://www.youtube.com/watch?v=vBvo7RVSEvk&feature=youtu.be

Saturday, August 2, 2014

Banana Surprise Lunch Message


"Awwwww!" This is our reaction when our team first saw this post. This is definitely a cute way to send a secret lunch message! Try using toothpick or something similar to write your message. When you first write it on a "less-ripe" banana, message will not be apparent, but when banana gets riper, the message will show up! It's like magic! 

Original Post:
http://starsandsunshine.com/2012/05/surprise-lunch-message/
http://www.cometogetherkids.com/2011/07/magic-message-bananas.html

Sunday, July 27, 2014

Mickey Mouse Cupcake

Mickey Mouse is adorable, but if you find it inside your cupcake, it is just awesome! This is an easy recipe by Ann, a food scientist and dietitian. Watch her video below, and you will be surprise how simple it is to make this cute Mickey Mouse cupcake!

 
Original Recipe:
http://www.howtocookthat.net/public_html/mickey-mouse-cupcakes-with-mickey-inside/

Friday, July 25, 2014

Adorable Popcorn Cupcakes


These cupcakes are decorated with popcorn liners and mini marshmallows to achieve a popcorn look. According to recipe from blog Tikkido by Nikki Wills, she began with baking cupcakes in these popcorn liners. After baked and cooled, cupcakes are painted with corn syrup. Lastly, arrange mini marshmallows and brown them by broiling. Enjoy this recipe and have a great movie night!

Original Recipe:
http://tikkido.com/node/808

Sunday, July 20, 2014

Fruit Roll-Ups Fortune Cookie

http://www.sheknows.com/food-and-recipes/articles/981183/fruit-roll-ups-fortune-cookie-valentines

By , this recipe is a really cute idea as gifts (with secret messages of course!) It is such an easy recipe to make: write your slip, cut out round fruit roll-ups, place your slip and finish it as a fortune cookie!

Original Recipe:
http://www.sheknows.com/food-and-recipes/articles/981183/fruit-roll-ups-fortune-cookie-valentines

Thursday, July 17, 2014

An Adorable Sweet Gift Idea, Bear Cookies

 
These adorable bear cookies can definitely melt our hearts! Not only these little bears look cute, they are made out of wheat dough. By 정민수(참새방앗간), a Korean baking school blog, they chose a ready-to-go cookie dough called cookie dough clay. It might not be available in your country, but don't give up! Choose any simple butter or sugar cookies recipe will work just fine to achieve the mini bear figure!

*This recipe requires quite some time to handle the dough properly.

Here is the translated recipe!

Ingredients:
     Wheat 175g plain cookie dough clay 
     Wheat 175g cocoa cookie dough clay 
     A little egg white 
     Chocolate Pen

Directions:
1. Prepare around 350g of cookie dough. (ready-to-go cookie dough or make your own homemade dough)
2. Divide the dough into half.

3. Flavor half of the dough with cocoa powder, and keep it in room temperature. 
4. For the other half of Plain dough: divide them into approximate weight: (Face) 76g, (ear) 36g, (border) 63g
    - Roll the "face" dough into a long log (about 2cm), wrap with plastic bag/wrap and freeze it.

    - Divide the "ear" dough, and roll them into two small logs, wrap and freeze it.
    - Roll the "border" dough into one rectangular sheet, sandwich with plastic wrap. 

      (Keep in Room Temperature)
5. When the "face" and "ear" doughs are harden, apply egg whites to the ears and stick them on top of "face" dough.
6. Put them back to the freezer until harden again.
7. Wrap cocoa dough around plain dough. (First fill in gaps between ear, and then wrap around the whole thing)
8. Roll the combined dough several times to make sure they stick together well. Put dough back to the freezer until harden again.
9. Wrap "
Border" dough around the hardened dough. Roll the dough log several times. Wrap and freeze until harden. 
10. Cut the dough log into thin cookies, and line them on a baking pan. Shape them if they don't stick together.
11. Apply a thin coat of the egg whites on each cookie. Put plastic wrap and freeze again.

12. Preheat the oven to 175 C
13. Bake cookies for about 12-15 minutes depending on thickness and the crispiness you like.
14. Enjoy! Or wrap it with a pretty gift box when cookies are completely cooled.

Original Recipe:
http://www.bakingschool.co.kr/recipe/recipe/recipe_view/recipe_no/3532/page/5

Monday, July 14, 2014

How to make Pink Fuzzy Slipper Cookies out of Nutter Butters


What a cute idea for cookies! It will be a cool gifts for your friends! This is a recipe by Hungry Happenings Blog, and it is extremely attractive by its pink fuzzy texture!

*Be aware that some people are allergic to peanuts! There are also other ideas out there like replacing sugar cookies with nutter butter cookie, and then using frosting instead of peanut butter.

Original Recipe:
http://www.hungryhappenings.com/2011/05/how-to-make-pink-fuzzy-slipper-cookies.html

Tuesday, July 8, 2014

Dinosaur Excavation Cake

http://www.instructables.com/id/dinosaur-excavation-cake/?ALLSTEPS
 
Need ideas for birthday cakes? Imagine what your birthday boy will react when he sees a dinosaur fossil in his cake! It will be a BLAST BIRTHDAY CAKE! Kids will definitely love this! Other fossils will be interesting too, such as chocolate shells, diamond candies, etc.

Recipe Link:
http://www.instructables.com/id/dinosaur-excavation-cake/?ALLSTEPS

Saturday, July 5, 2014

Teddy Bear Bread Loaf Pan


http://cookpad.com/recipe/1394916

This bear pan might be a little bit new to us. Usually, we make bread in a rectangular loaf pan, or make whatever shapes we like with our bare hands. This bear loaf pan bakes in a tube with a bear shape in cross section. Pretty neat right?

Recipe is in Japanese, here's a quick translation:

Ingredients:
Bread flour 200g
Sugar 12g
Salt 4g
Dry yeast 3g
Eggs 25g (1/2 pieces)
Milk 115g
Unsalted butter 16g
Cocoa powder + hot water 3g +3 g


Instruction:
1. Added cocoa powder in hot water. Combined all other ingredients. Knead until smooth.
2. Dish out 70g of the dough. Mix the rest of the dough with cocoa mixture until no irregularities.
3. Brush 2 bowls with oil or butter, place the 2 doughs into each bowl. In a warm place, ferment doughs until about 2.5 times of its original size.
4. Flour the counter top or a working space. Lay a wet towel/cloth/paper towel on top. Place doughs on top of wet towel and rest for 15 minutes. (See 1st photo on the right)
5. Because the mold around 18 cm long, Roll the cocoa dough in a thick 18cm sheet. Roll the original dough into a 18cm rod shape. (See 2nd photo on the right)

6. Roll ONLY the edge of cocoa dough sheet so that it is thinner than the rest of the cocoa sheet.
7. Put the rod shape dough (original) onto cocoa dough sheet and wrap around it. 
8. Butter or spray interior of mold/loaf pan. Place pan with "bear ears" facing down. Place entire dough inside the pan with cocoa dough side facing the "bear ear" of the pan. (See 3rd photo on the right) Make sure original dough is in the center position at this time.      
9. Bake 30-40 minutes at 40 degrees C to allowed dough to ferment more.

10. Now, bake the dough in a 180 degree C for 25-30 minutes with a lid. Let cool and remove from the mold.
11. Slice the bread, and complete with chocolate eyes and nose. Enjoy!

Original Recipe:
http://cookpad.com/recipe/1394916

Bear Loaf Pan Bread Mold:
http://www.allthingsforsale.com/bakery-baking-sweet-mold/3303-japanese-loaf-pan-bread-mold-bear-small-4904940023883.html